
Introduction
A Virtual Private Network well known as VPN is a tool that gives you a secure and encrypted connection while you are browsing online by creating a private network from a public internet connection. The VPN masks your IP address and makes it untraceable, this way, cybercriminals will not be able to see your online activities and your location thus it helps you to use public Wi-fi more safely.
What is OpenVPN
OpenVPN is an open-source trusted technology that uses SSL/TLS protocol to facilitate a secure tunnel between two points in a network. One thing about OpenVPN is that when you use it to connect to a VPN, your data will be stored under strong encryption.
Benefits of OpenVPN
Some of the features which make OpenVPN popular are;
- Community support since it is open-source software, it receives a lot of support from the community.
- It is more reliable
- It is more cost-friendly because it is free to download on any OS.
- OpenVPN is more secure with security layers such as Preshared keys and Peer Authentification.
- It has extensive platform support such that it can be installed on any Operating System be it Windows, Linux, iOS, macOS, etc.
- Firewalls imposed by the network can not block OpenVPN.
Installation of OpenVPN Client on Ubuntu
Now that we know a little about OpenVPN, we are going to learn how we can install, configure and use it on ubuntu 20.04.
Installation of OpenVPN can be done on both the Commandline Interface and the Graphical User Interface, therefore we’ll look at both instances.
1. Connect Via Commandline
Step 1: Install the OpenVPN client package
We will first install the OpenVPN package on our machine with the following command:
$ sudo apt install openvpnStep 2: Navigate and find your client config file
You need to find the config file from your directories. For our case the file is located in the downloads directory:
isaiahmatin@isaiah:~/Downloads$ ls
[email protected]
Now move your configuration file to the OpenVPN configuration folder. Remember to replace your own file with the example used in this case:
~/Downloads$ sudo mv [email protected] /etc/openvpn/techiescodevpn.confNow that you have moved the config file, open your preferred editor and edit the file to suit your preferences.
nano /etc/openvpn/techiescodevpn.confSave and exit the file.
Step 3: Connect to the OpenVPN
To connect to the OpenVPN, first, start the OpenVPN service by running:
$ systemctl start openvpnThen enter the following command:
$ sudo openvpn /etc/openvpn/techiescodevpn.confYou will receive a message at the end of the output saying that the initialization sequence has been completed.
2022-07-11 13:56:14 net_route_v4_best_gw query: dst 0.0.0.0
2022-07-11 13:56:14 net_route_v4_best_gw result: via 192.168.88.1 dev wlo1
2022-07-11 13:56:14 ROUTE_GATEWAY 192.168.88.1/255.255.255.0 IFACE=wlo1 HWADDR=ac:7b:a1:97:fd:bf
2022-07-11 13:56:14 TUN/TAP device tun2 opened
2022-07-11 13:56:14 net_iface_mtu_set: mtu 1500 for tun2
2022-07-11 13:56:14 net_iface_up: set tun2 up
2022-07-11 13:56:14 net_addr_v4_add: 10.87.0.10/24 dev tun2
2022-07-11 13:56:14 net_route_v4_add: 10.10.10.40/32 via 192.168.88.1 dev [NULL] table 0 metric -1
2022-07-11 13:56:14 net_route_v4_add: 0.0.0.0/1 via 10.87.0.1 dev [NULL] table 0 metric -1
2022-07-11 13:56:14 net_route_v4_add: 128.0.0.0/1 via 10.87.0.1 dev [NULL] table 0 metric -1
2022-07-11 13:56:14 WARNING: this configuration may cache passwords in memory -- use the auth-nocache option to prevent this
2022-07-11 13:56:14 Initialization Sequence Completed
This shows that you have successfully connected the OpenVPN client.
2. Connect OpenVPN file via GUI
To connect the OpenVPN client file from the Graphical User Interface is relatively easier since we already have the file with us. You only need to know where the file is located then you can proceed from there.
But first, we need to install the network manager which will allow us to connect OpenVPN via GUI. To install network manager, open your terminal and run the following command:
$ sudo apt-get -y install network-manager-openvpnRestart the network-manager service by running:
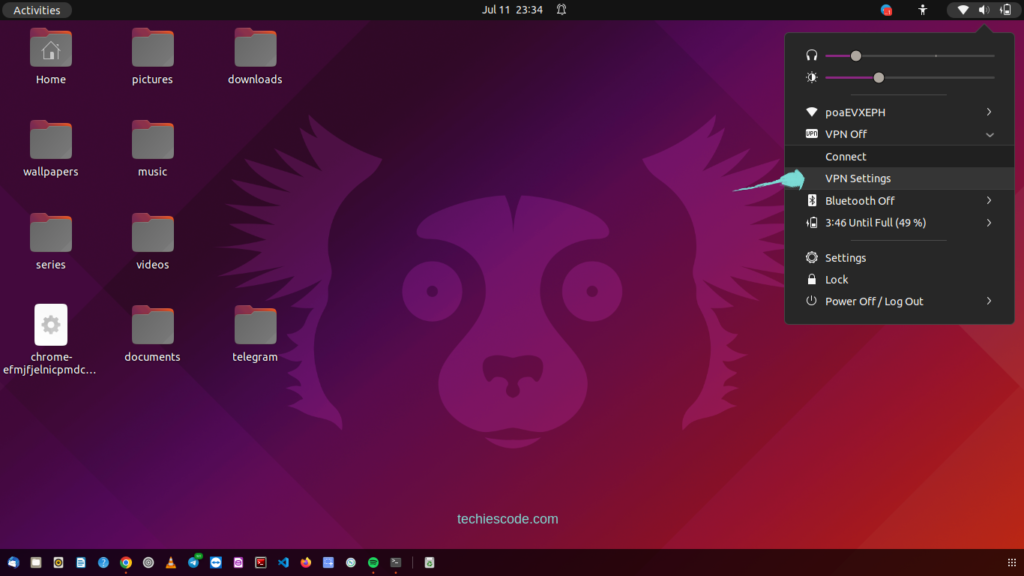
$ sudo systemctl restart network-managerNow navigate to the top right screen and click on VPN then VPN Settings as shown:
On the network settings page, click the Add (+) sign:
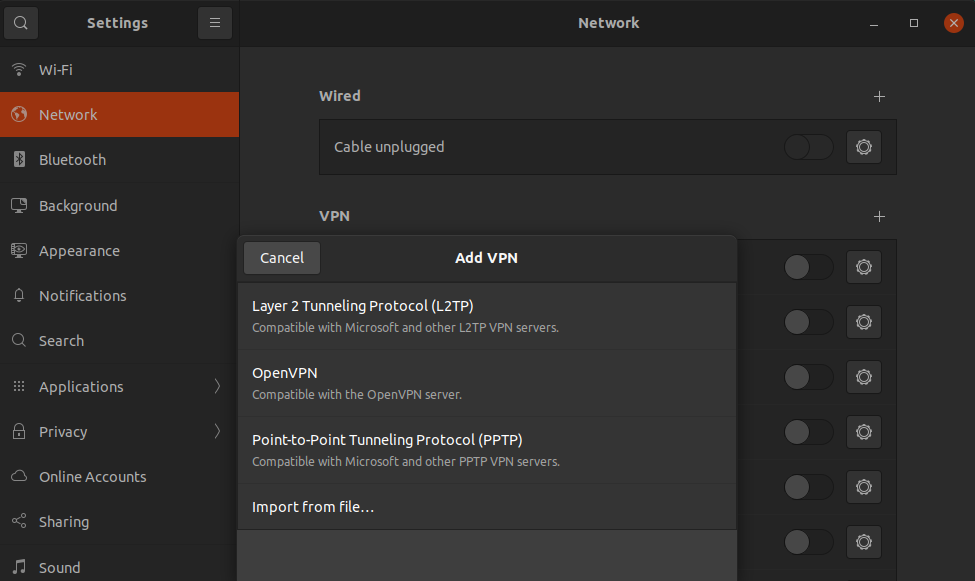
It will take you to a popup page with several options, click on import from file…
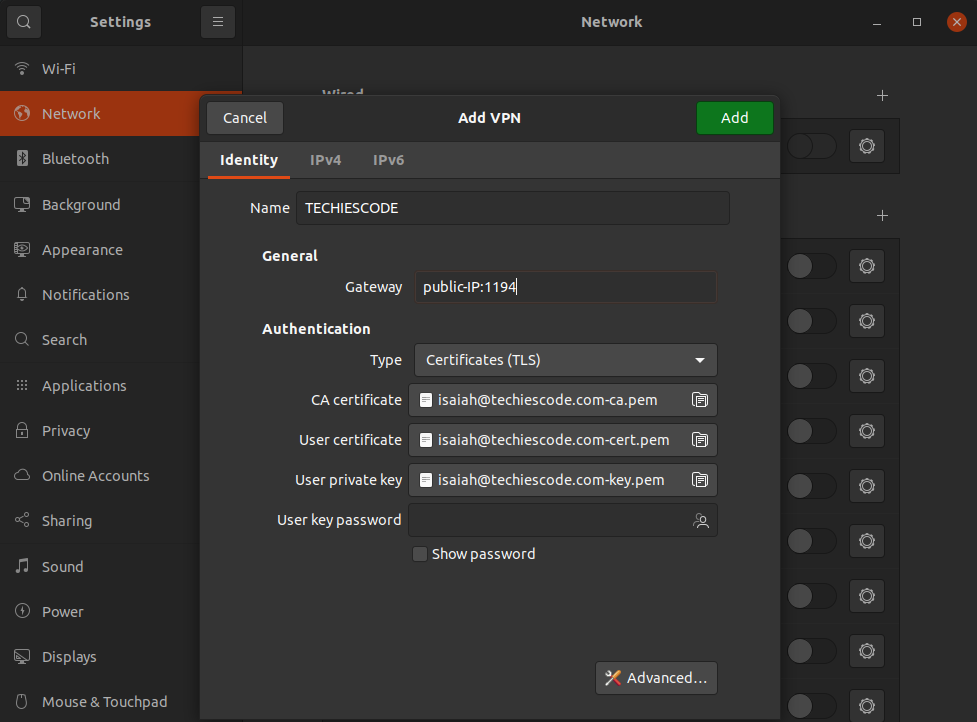
You will be taken to your machine directory where you will select the preferred OpenVPN file to be imported, select and click open:
After opening the file, now proceed and Add it;
Now you have added the OpenVPN to your list, you will need to start it by toggling the button on its right:

At the top right corner of your screen in the notification bar, you will be able to see a new icon showing that the OpenVPN has been connected successfully:
Your OpenVPN is successfully connected via GUI, you can now browse online without any fear of being traced.
Conclusion
We have successfully installed and configured the OpenVPN client on both Commandline Interface and the Graphical user Interface. I believe you are now in a position to connect the OpenVPN client on your machine with much expertise.