
PostgreSQL is an open-source relational database system that implements the SQL query language.
In this tutorial we will be setting up Postgres to run on an Ubuntu 22 server, we start with the installation process to setting up a new user and database.

Requirements
Ubuntu 22.04 Server
Root user or a user with root privileges
We start the process by doing a system update and a complete upgrade of the database repo list.
sudo apt update -y
Hit:1 http://ke.archive.ubuntu.com/ubuntu jammy InRelease
Hit:2 http://ke.archive.ubuntu.com/ubuntu jammy-updates InRelease
Hit:3 http://ke.archive.ubuntu.com/ubuntu jammy-backports InRelease
Hit:4 http://ke.archive.ubuntu.com/ubuntu jammy-security InRelease
Reading package lists... Done
Building dependency tree... Done
Reading state information... Done
1 package can be upgraded. Run 'apt list --upgradable' to see it.
sudo apt upgrade -y

Reading package lists... Done
Building dependency tree... Done
Reading state information... Done
Calculating upgrade... Done
The following packages have been kept back:
update-notifier-common
0 upgraded, 0 newly installed, 0 to remove and 1 not upgraded.
Once our system is up to date we then install Postgres using the default repository package.
sudo apt install postgresql postgresql-client

Reading package lists... Done
Building dependency tree... Done
Reading state information... Done
The following additional packages will be installed:
libcommon-sense-perl libjson-perl libjson-xs-perl libllvm14 libpq5 libsensors-config libsensors5 libtypes-serialiser-perl
postgresql-14 postgresql-client-14 postgresql-client-common postgresql-common ssl-cert sysstat
Suggested packages:
lm-sensors postgresql-doc postgresql-doc-14 isag
The following NEW packages will be installed:
libcommon-sense-perl libjson-perl libjson-xs-perl libllvm14 libpq5 libsensors-config libsensors5 libtypes-serialiser-perl postgresql
postgresql-14 postgresql-client postgresql-client-14 postgresql-client-common postgresql-common ssl-cert sysstat
0 upgraded, 16 newly installed, 0 to remove and 1 not upgraded.
Need to get 42.4 MB of archives.
After this operation, 161 MB of additional disk space will be used.
Do you want to continue? [Y/n] y
Once Postgres has been set up we can verify its running status using:
systemctl status postgresql.service

● postgresql.service - PostgreSQL RDBMS
Loaded: loaded (/lib/systemd/system/postgresql.service; enabled; vendor preset: enabled)
Active: active (exited) since Thu 2023-01-26 11:24:55 UTC; 3min 14s ago
Main PID: 18669 (code=exited, status=0/SUCCESS)
CPU: 4ms
Jan 26 11:24:55 testvm systemd[1]: Starting PostgreSQL RDBMS...
Jan 26 11:24:55 testvm systemd[1]: Finished PostgreSQL RDBMS.
To set Postgres to startup on boot we enable it using the below command.
systemctl enable  postgresql.service

Synchronizing state of postgresql.service with SysV service script with /lib/systemd/systemd-sysv-install.
Executing: /lib/systemd/systemd-sysv-install enable postgresql
Once we have Postgres on the server we will be changing the service listening IP, to allow us to be able to log in remotely from a specific IP or the internet. To do this we will be editing the postgresql.conf file for Postgres.
We can use the below command to get the location of the postgresql.conf file.
sudo -u postgres psql -c 'show config_file'
could not change directory to "/root": Permission denied
config_file
-----------------------------------------
/etc/postgresql/14/main/postgresql.conf
(1 row)
We will add the below to allow Postgres to listen on a different IP.
listen_addresses = 'localhost'         # what IP address(es) to listen on;
#Allow bind to all addresses
listen_addresses  = '*'
To allow a user to be able to login remotely we will have to edit the hba.conf. We can find the file using the below command.
sudo -u postgres psql -c 'show hba_file'
hba_file
-------------------------------------
/etc/postgresql/14/main/pg_hba.conf
(1 row)
Using the text editor of your choice we will edit the hba.conf file.
vim /etc/postgresql/14/main/pg_hba.confAdd the below line in the IPv4 local connections section.
# IPv4 local connections:
host    all             all             127.0.0.1/32            scram-sha-256
host    all             rony            0.0.0.0/0               md5
host    all             all             ::/0                    md5
For multiple IP addresses, list them and separate them with a comma. For security reasons, leave it to listen on localhost. After the change, restart the service.
sudo systemctl restart postgresqlThe PostgreSQL database admin user is created with the installation of the PostgreSQL database server. We need to set a secure password for this user.
sudo -i -u postgres
postgres@testvm:~$ psql
psql (14.6 (Ubuntu 14.6-0ubuntu0.22.04.1))
Type "help" for help.
postgres=#
postgres=# ALTER USER postgres WITH PASSWORD 'MyStr0ngDBP@ss';
We will now create a test database and user, as well as set a password for the user.
postgres=# create user rony ;
CREATE ROLE
postgres=# create database techiesdb ;
CREATE DATABASE
postgres=# alter database techiesdb owner to rony ;
ALTER DATABASE
postgres=#
To verify the created user and database we use the below code.
postgres-# \l
postgres  | postgres | UTF8     | en_US.UTF-8 | en_US.UTF-8 |
 techiesdb | rony     | UTF8     | en_US.UTF-8 | en_US.UTF-8 |
 template0 | postgres | UTF8     | en_US.UTF-8 | en_US.UTF-8 | =c/postgres          +
|          |          |             |             | postgres=CTc/postgres
template1 | postgres | UTF8     | en_US.UTF-8 | en_US.UTF-8 | =c/postgres          +
|          |          |             |             | postgres=CTc/postgres
postgres-# \du
postgres  | Superuser, Create role, Create DB, Replication, Bypass RLS | {}
rony      |                                                            | {}
Firewall Configuration
We will have to configure the firewall to allow port 5432 (for Postgres) if the firewall on your server is active. PostgreSQL runs on port 5432 by default. We’ll need to allow access to this port using the command below.
sudo ufw allow 5432/tcp
Rules updated
Rules updated (v6)
sudo ufw reload
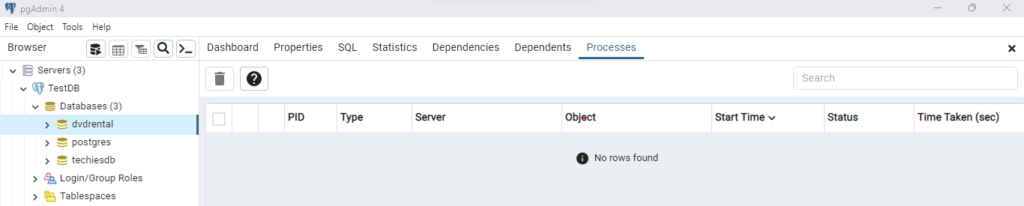
Firewall reloadedWe can connect to our Postgres database remotely using PgAdmin a 3rd party application that allows us to connect remotely to the service without having to interact with the terminal.
Once downloaded we connect it to our database.
On the PgAdmin menu, we will Right click on the Servers option and select the Register-Server option.
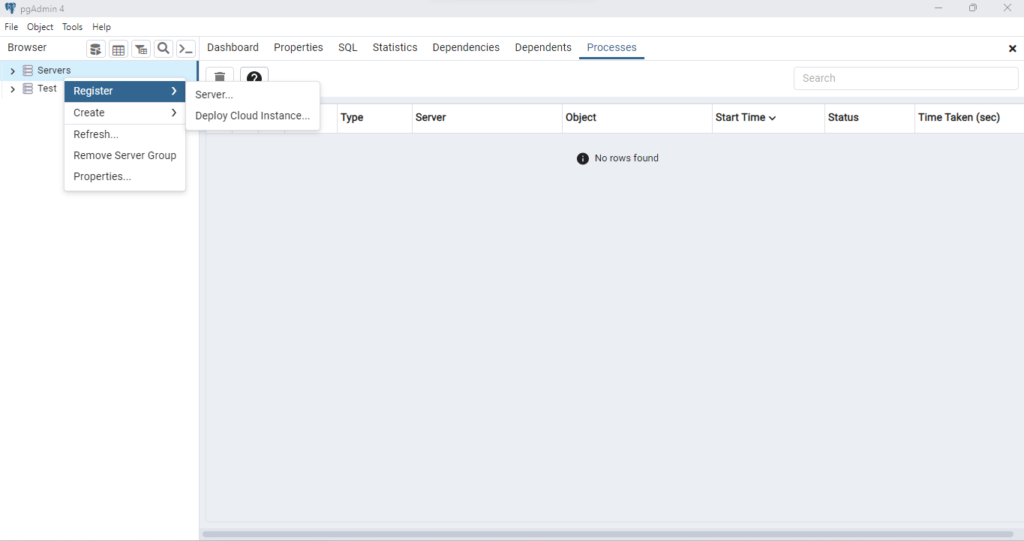
The following pop will appear for us to connect to the DB. We will use the General and Connection tabs to connect to our DB.
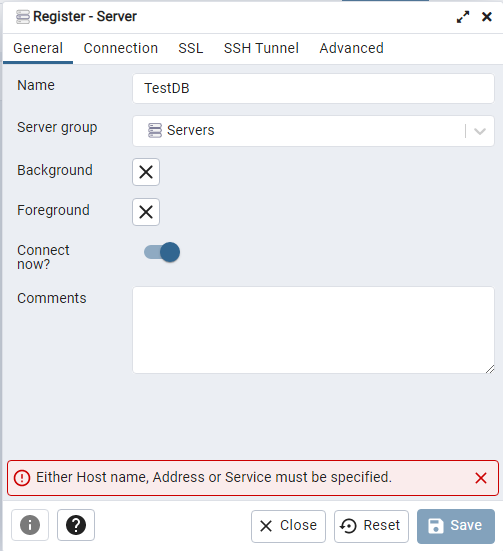
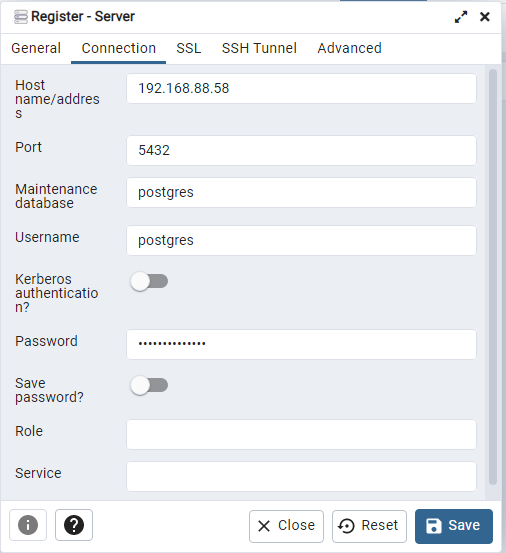
Once done we click on the save option to connect to our DB.
Conclusion
In this tutorial, we learned how to install Postgres on Ubuntu 20.04|21.04|22.04. Thanks for reading and for your support. Leave a comment in the comment section and share it with friends.
How to Install 3CX Phone System V18.0 in Debian 10

Thanks for your useful article.
Great! thank you very much.