
Nginx is currently one of the most utilized globally web hosting engine. I one of the most powerful web-server application with capability to host websites with large and high traffics on the internet. It is an open source application thus freely available at zero cost. In comparison with apache server, nginx is more resourcefully friendly and can be used as web-server or reverse proxy.
In this article we are going to discuss to install and use nginx as a webserver on Ubuntu 18.04 and Ubuntu 20.04. This installation guide is applicable to both Ubuntu server and desktop.
Installing Nginx
Nginx by default is already available in Ubuntu repositories. Therefore we are just going to use apt command to install nginx. First we need to update our repositories first to update to latest. Copy and paste the commands below in terminal to perform installation.
sudo apt update
sudo apt install nginx
The following screen will pop up .
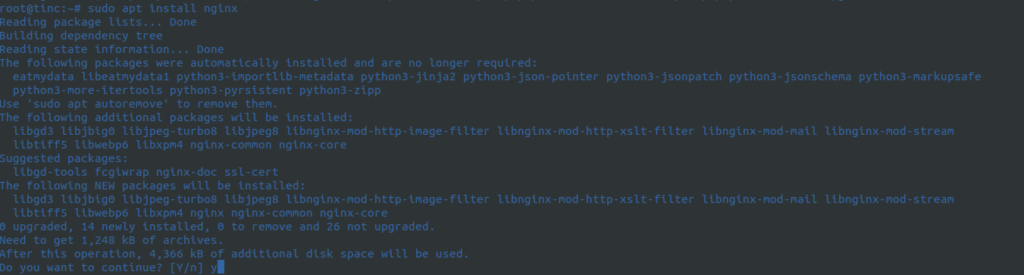
Press Y as shown above to accept and continue with installation. Wait for installation uninterrupted to run to completion.
Firewall Configuration.
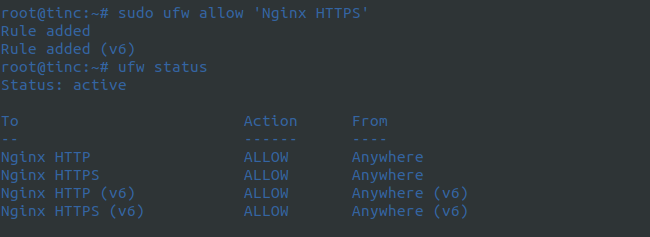
Firewall rules define what comes in and goes out via specific port in a server. Since Nginx is a webserver, will need to be accessible via web browser. By default Nginx registers itself wit Uncomplicated Firewall (ufw) making easy to allow in firewall. To see application registered in ufw run the command below in terminal.
sudo ufw list
Nginx Full – This opens both port 80 (unsecure TCP traffics) and port 443 (TSL/SSL secured traffics). Nginx HTTP – Allows insecure web traffics only via port 80. Nginx HTTPS – This profile allows opens port 443 for TSL/SSL secured web traffics only.
Since we are using sever with no SSL installed, we are going to open port 80 for normal web traffics.
sudo ufw allow 'Ngnix HTTP'
or
sudo ufw allow 80/tcp
#see effected changes.
sudo ufw status
After the final command, you should be able to see screen similar to this one below. We can see that HTTP traffics have been allowed.
Check Websever Status.
At this point we want to verify that nginx services are up and running. Run the command below in terminal to show status.
systemctl status nginx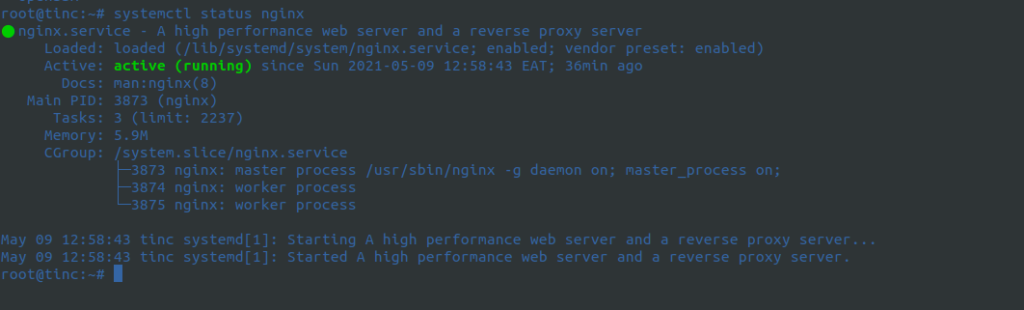
Test and verify installation of nginx in browser by entering your server domain or IP to see nginx default page.
http://my_server_ip
or
http://my_server_domain
Congratulations!! You have now your webserver installed ready to host a website.
Managing Nginx Processes.
To start web server run the command below;
sudo systemctl start nginxTo stop web server run the command below;
sudo systemctl stop nginxTo restart web server run the command below;
sudo systemctl restart nginxTo reload service to effect changes in configuration without dropping the connection use below command;
sudo systemctl reload nginxTo disable auto-start in nginx when server boots run below command. This means you will instead have to start nginx manually every time server does a reboot
sudo systemctl disable nginxTo revert to service start on server start up or reboot simply use below command.
sudo systemctl enable nginxConclusion
In this guide, we have covered on how you can install nginx as a web server in iubuntu 18.04 and ubuntu 20.04 servers. We have also learned how to enables web sever accessible on internet by allowing TCP ports in firewall. Furthermore, we have also discussed on how to manipulates nginx processes.
Please stay tuned for more guides. Don’t miss out next article configuring server blocks in nginx. This allows hosting of multiple web application on a single server.