

Pronounced as engine x, Nginx is an open-source web server. However, apart from acting independently as a web server, it is also used as a reverse proxy server by directing web traffic to its specific servers. It also acts as an email proxy and HTTP load balancer.
For Linux distributions, Nginx is available for free.
Now, Nginx can operate independently as a web server, however, with php-fpm( FastCGI Process Manager) Nginx can function more efficiently.
So, how do Nginx and php-fpm relate? Well, for instance when a browser requests for a file and the file seems to be a dynamic file, Nginx forwards the request to php-fpm where the worker process of php-fpm will process the request by loading the php script file for execution. It will finally return the result to Nginx which will process the result and send it back to the browser for display.
The leading competitor for Nginx is Apache, it is the leading most popular webserver worldwide. But that does not stop Nginx from being used by some great companies including WordPress, NASA, Netflix, etc. Nginx got some amazing features that give it an added advantage over Apache.
Features of Nginx
- Load balancing
- Virtual host
- Static HTP server
- Reverse proxy server
- Monitoring plugins
Step 1: System Update
Make sure you are having an updated and upgraded ubuntu server.
 sudo apt update
sudo apt upgrade
Step 2: Install Nginx on Ubuntu
Run the following command to install Nginx on your ubuntu machine.
$ sudo apt install nginxNow check whether it is installed, up, and running.
$ systemctl status nginxIt should display the following screen
● nginx.service - A high performance web server and a reverse proxy server
Loaded: loaded (/lib/systemd/system/nginx.service; enabled; vendor preset: enabled)
Active: active (running) since Fri 2022-05-06 15:14:29 EAT; 4h 6min ago
Docs: man:nginx(8)
Main PID: 229431 (nginx)
Tasks: 3 (limit: 2269)
Memory: 4.8M
CGroup: /system.slice/nginx.service
├─229431 nginx: master process /usr/sbin/nginx -g daemon on; master_process on;
├─229432 nginx: worker process
└─229433 nginx: worker process
Step 3: Install PHP-FPM on Ubuntu
You will have to look for the latest versions of PHP for ubuntu. The latest versions are found in the ppa:ondrej/php PPA repositories. By the time am writing this article latest version was 8.1.
The following commands should install the PPA repositories to your ubuntu system.
$ sudo apt install software-properties-common
$ sudo add-apt-repository ppa:ondrej/php
Now install PHP-FPM with the following commands;
$ sudo apt update
$ sudo apt install php php-cli php-fpm php-json php-mysql php-zip php-gd  php-mbstring    php-curl php-xml php-pear php-bcmath
A PHP-FPM service should be running. Confirm with the command below;
$ systemctl status php*-fpm.service● php8.1-fpm.service - The PHP 8.1 FastCGI Process Manager
Loaded: loaded (/lib/systemd/system/php8.1-fpm.service; enabled; vendor preset: enabled)
Active: active (running) since Fri 2022-05-06 15:46:51 EAT; 3h 42min ago
Docs: man:php-fpm8.1(8)
Process: 245824 ExecStartPost=/usr/lib/php/php-fpm-socket-helper install /run/php/php-fpm.sock /etc/php/8.1/fpm/pool.d/www.conf 81 (code=exited, >
Main PID: 245806 (php-fpm8.1)
Status: "Processes active: 0, idle: 2, Requests: 0, slow: 0, Traffic: 0req/sec"
Tasks: 3 (limit: 2269)
Memory: 9.9M
CGroup: /system.slice/php8.1-fpm.service
├─245806 php-fpm: master process (/etc/php/8.1/fpm/php-fpm.conf)
├─245822 php-fpm: pool www
└─245823 php-fpm: pool www
Step 4: Configure PHP and Nginx
Now that you have already installed both Nginx and PHP-FTP on ubuntu, the next step is to configure them so that Nginx uses PHP to process PHP files. Configuration of Nginx with php-fpm has got a number of steps that we’ll follow closely.
Now, you should be having either default Nginx file or virtual host files on your server, you will have to decide on which files you will be editing. for our case, we will edit the default Nginx files.
Use the following command to open your default Nginx file;
sudo nano /etc/nginx/sites-available/defaultIn the configuration file, enter into search mode and search index. Then add index.php before the index.html directive. The output should look like the one below;
index index.php index.html index.htm index.nginx-debian.html inde>Still in the configuration file, search for location ~ .php. The section is wholly commented;
 # pass PHP scripts to FastCGI server
#
#location ~ \.php$ {
#        include snippets/fastcgi-php.conf;
#
# With php-fpm (or other unix sockets):
        fastcgi_pass unix:/var/run/php/php8.1-fpm.sock;
               # With php-cgi (or other tcp sockets):
#fastcgi_pass 127.0.0.1:9000;
#}
#
# deny access to .htaccess files, if Apache's document root
# concurs with nginx's one
#
#location ~ /\.ht {
#       deny all;
#}
However, some of the lines need to be uncommented ie removing the # symbol. The following code should give you a hint on which lines should be uncommented.
 # pass PHP scripts to FastCGI server
#
location ~ \.php$ {
include snippets/fastcgi-php.conf;
#
#       # With php-fpm (or other unix sockets):
fastcgi_pass unix:/var/run/php/php8.1-fpm.sock;
#       # With php-cgi (or other tcp sockets):
#fastcgi_pass 127.0.0.1:9000;
}
Your edited file should be looking like the one above. Uncommenting the lines ensures that Nginx is sending requests to the PHP socket. Now save and exit the file.
To apply the changes, restart Nginx.
$ sudo service nginx restartStep 5: Test PHP configuration
We will have to create a test PHP file inside the document root of the default Nginx site.
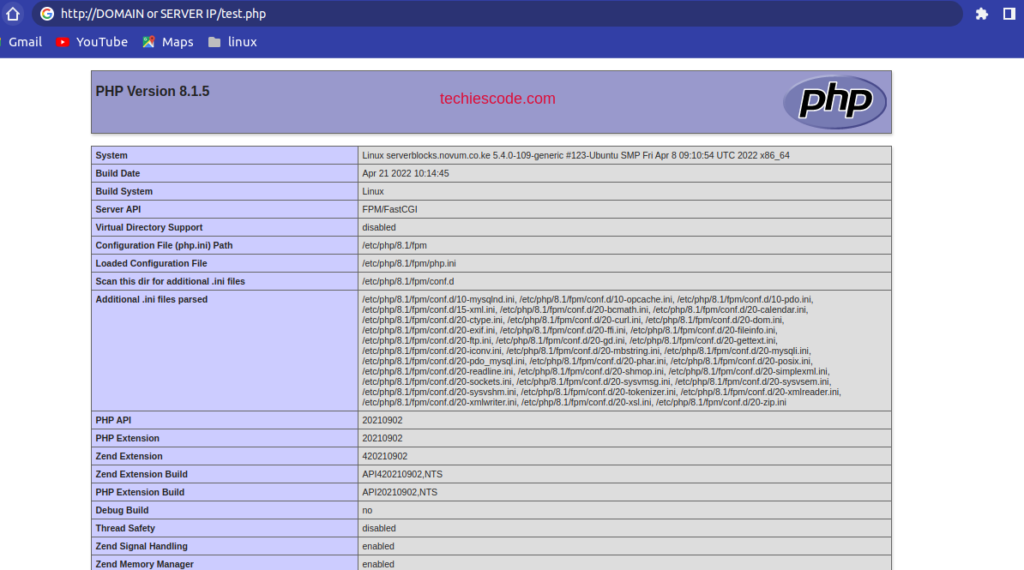
$ echo "<?php phpinfo(); ?>" | sudo tee /var/www/html/test.phpnow that you have created a PHP file, go to your browser and access the test file by browsing your domain or server IP followed by /test.php.
http://DOMAIN or SERVER IP/test.phpHaving followed the steps accurately, you will be able to see a page similar to the one below, with all your information concerning your PHP installation, and that means that you have successfully configured Nginx with php-fpm on your ubuntu server. Your configuration is therefore working as expected.
For a better experience with php-fpm, you can install MySQL or other databases.
Conclusion
You have successfully installed Nginx with php-fpm on ubuntu. You can now enjoy the efficient use of Nginx with php-fpm to manage your web servers. Thank you for visiting our site.
How to Install Apache in Ubuntu 18.04/20.04
How to Install Nginx in Ubuntu 20.04
Learn How to Configure Nginx Server-Blocks in Ubuntu 22.04|20.04|18.04

This is very attention-grabbing, You are an overly skilled blogger.
I have joined your feed and sit up for searching
for extra of your excellent post. Also, I have shared your website in my social networks
Thank you so much Twicsy
My brother suggested I might like this web site.
He was entirely right. This post actually made my day.
You can not imagine just how much time I had spent for this info!
Thanks!
Also visit my web-site – casino 20 freispiele [Callie]
Thanks Callie
I’ve read some just right stuff here. Certainly price bookmarking for revisiting.
I wonder how so much effort you place to create this kind of fantastic informative web
site.