
Introduction
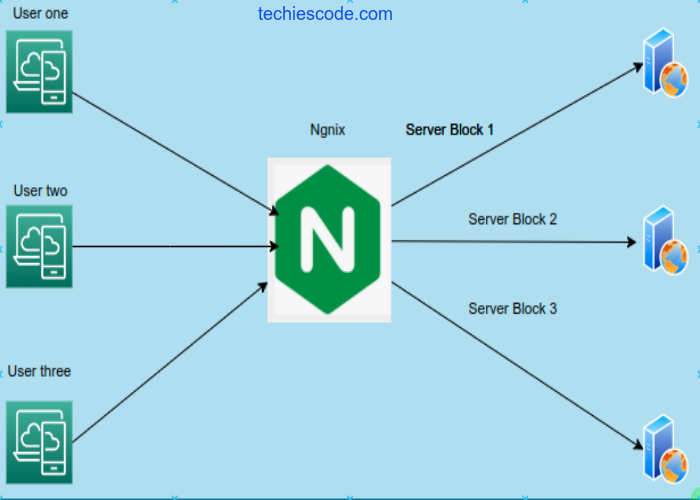
When the need to host more than one website or domain on your Nginx web server arises, you’ll need to configure a server block(known virtual host in apache) which will enclose configuration details and host more than one domain or website on a single server.
Here, we will be taking you through a comprehensive step by step guide on how to configure server blocks on ubuntu 18.04
Requirements
Before you begin, you’ll need to meet the following prerequisites;
- You should have installed Nginx in your ubuntu system. If not, (link)
- Have a user account with sudo privileges
- Have a domain name pointing to your public server IP
Assuming you have already installed Nginx and it’s running on your machine, you should now configure the server blocks.
Step 1: Create a directory structure
You will have to create two separate domains that will contain all the settings related to the Nginx server. This will help us understand how we can be able to run several web servers using server blocks. For our case, we will use test1.example.com and test2.example .com as our domain name.
 $ sudo mkdir -p /var/www/test1.example.com/html
$ sudo mkdir -p /var/www/test2.example.com/html
Now assign the directory’s ownership to the currently logged-in user. This will be done using the $ USER environment variable. Here, ensure to be logged in as a regular user rather than a sudo user, it will make it easier for us to edit or create the content in the directories.
 $ sudo chown -R $USER:$USER /var/www/test1.example.com/html
$ sudo chown -R $USER:$USER /var/www/test2.example.com/html
Grant the logged-in user the read, write and execute permissions.
$ sudo chmod -R 755 /var/www/Step 2: Create sample pages
Now create a sample index.html file inside the domain root directory for each of our sites that will be displayed when you visit the domain in your browser.
For the first file;
$ sudo vim /var/www/test1.example.com/html/index.htmlPaste the following HTML content.
    <html>
<head>
<title>Welcome to your_domain!</title>
</head>
<body>
<h1><center>Welcome to Nginx Server Blocks</h1>
<p><center>Congratulations!! You have susccessfully configured your first Nginx Server block.</p>
</body>
</html>
Save and exit the configuration file.
For the second file;
$ sudo vim /var/www/test2.example.com/html/index.htmlCopy and paste in the following content;
 <html>
<head>
<title>Welcome to your_domain!</title>
</head>
<body>
<h1><center>Welcome to Nginx Server Blocks</h1>
<p><center>Congratulations!! You have susccessfully configured your second Nginx Server block.</p>
</body>
</html>
Save and exit the configuration file.
Now the content inside the configuration files will be displayed when you visit your website in your browser.
Step 3: Create Nginx server blocks
The location for Nginx servers is in the
/etc/nginx/sites-available
directory. We will therefore need to create server blocks that will serve the content in the
index.html
files we created earlier.
With sudo privileges, key in the following command to create the first server block for the first site.
$ sudo vim /etc/nginx/sites-available/test1.example.comPaste in the content below;
server {
listen 80;
listen [::]:80;
root /var/www/test1.example.com/html;
index index.html index.htm index.nginx-debian.html;
server_name test1.example.com;
location / {
try_files $uri $uri/ =404;
}
save and exit the file.
Do the same for the second site.
$ sudo vim /etc/nginx/sites-available/test2.example.compaste in the following content;
server {
listen 80;
listen [::]:80;
root /var/www/test2.example.com/html;
index index.html index.htm index.nginx-debian.html;
server_name test2.example.com;
location / {
try_files $uri $uri/ =404;
}
Save and exit the file.
Step 4: Enable Nginx Server Block
Link the Nginx server block to
/etc/nginx/sites-enabled/
directory as shown to enable;
$ sudo ln -s /etc/nginx/sites-available/test1.example.com /etc/nginx/sites-enabled/
$ sudo ln -s /etc/nginx/sites-available/test2.example.com /etc/nginx/sites-enabled/
You should now confirm whether all configurations are in order.
$ nginx -tIf you followed the steps correctly, you should get the following output;
$ sudo nginx -t
nginx: the configuration file /etc/nginx/nginx.conf syntax is ok
nginx: configuration file /etc/nginx/nginx.conf test is successful
For the changes to occur, restart Nginx then confirm whether it is running.
sudo systemctl restart nginx
systemctl status nginx
Nginx is running on your Ubuntu machine.
● nginx.service - A high performance web server and a reverse proxy server
Loaded: loaded (/lib/systemd/system/nginx.service; enabled; vendor preset: enabled)
Active: active (running) since Thu 2022-05-12 23:54:38 EAT; 3s ago
Docs: man:nginx(8)
Process: 54491 ExecStartPre=/usr/sbin/nginx -t -q -g daemon on; master_process on; (code=exited, status=0/SUCCESS)
Process: 54507 ExecStart=/usr/sbin/nginx -g daemon on; master_process on; (code=exited, status=0/SUCCESS)
Main PID: 54508 (nginx)
Tasks: 3 (limit: 2260)
Memory: 3.6M
CGroup: /system.slice/nginx.service
├─54508 nginx: master process /usr/sbin/nginx -g daemon on; master_process on;
├─54509 nginx: worker process
└─54510 nginx: worker processStep 5: Test the Nginx server block
By now, all the two sites should be working as expected. we will test each one of them separately by browsing your domain name in your favorite browser. you should be able to see the sample HTML text we had set earlier.
for the first site you’ll see a page similar to the one below;

for the second site, a similar page will be seen too,

When you see these pages in your browser, then the server blocks are working as expected.
Conclusion
Congratulations, you have successfully configured Nginx with php-fpm. You can now host more than one web server with much ease. Thank you for visiting our site.

2 thoughts on “Learn How to Configure Nginx Server-Blocks in Ubuntu 22.04|20.04|18.04”