
Nginx is a popular web server in the world that takes control over hosting some of the largest and highest traffic sites on the internet. Nginx is a lightweight choice that can either be used as a web server or reverse proxy ie, it can be used for security and load balancing but can also function independently as a web server.
Features of Nginx
Reverse proxy with caching
IPV6
Load balancing
Fast CGI support with caching
Web sockets
Handling of static files, index files and auto-indexing
TLSISSI with SNI
Installation of Nginx
To start installation, run this command to update the system first.
sudo apt update && sudo apt upgrade -yNow install Nginx.
$ sudo apt install nginx

libnginx-mod-http-image-filter libnginx-mod-http-xslt-filter libnginx-mod-mail libnginx-mod-stream libtiff5 libwebp6 libxpm4
nginx-common nginx-core
Suggested packages:
libgd-tools fcgiwrap nginx-doc ssl-cert
The following NEW packages will be installed:
fontconfig-config fonts-dejavu-core libfontconfig1 libgd3 libjbig0 libjpeg-turbo8 libjpeg8 libnginx-mod-http-geoip
libnginx-mod-http-image-filter libnginx-mod-http-xslt-filter libnginx-mod-mail libnginx-mod-stream libtiff5 libwebp6 libxpm4 nginx
nginx-common nginx-core
0 upgraded, 18 newly installed, 0 to remove and 1 not upgraded.
Need to get 2,461 kB of archives.
After this operation, 8,210 kB of additional disk space will be used.
Do you want to continue? [Y/n] Y
Select Y to accept installation to continue.
Firewall Configuration
We will need to allow ports in firewall to allow accessibility over internet. Allow both port 80 and 443 for SSL/TLS acces and non secure access.
$ sudo ufw allow 80/tcp
#Also allow HTTPS traffics
$ sudo ufw allow 443/tcp
To confirm if ports are now exposed, run commands below.
$ sudo ufw status

Status: active
To                         Action      From
--                         ------      ----
80/tcp                     ALLOW       Anywhere
443/tcp                    ALLOW       Anywhere
22/tcp                     ALLOW       Anywhere
80/tcp (v6)                ALLOW       Anywhere (v6)
443/tcp (v6)               ALLOW       Anywhere (v6)
22/tcp (v6)                ALLOW       Anywhere (v6)
By default, Nginx starts automatically due installation. To check the status run this command in your terminal.
$ sudo systemctl status nginx

● nginx.service - A high performance web server and a reverse proxy server
Loaded: loaded (/lib/systemd/system/nginx.service; enabled; vendor preset: enabled)
Active: active (running) since Thu 2021-09-23 16:28:41 UTC; 27min ago
Docs: man:nginx(8)
Main PID: 44267 (nginx)
Tasks: 3 (limit: 2303)
CGroup: /system.slice/nginx.service
├─44267 nginx: master process /usr/sbin/nginx -g daemon on; master_process on;
├─44268 nginx: worker process
└─44269 nginx: worker process
Next, run your server_IP in the browser to validate your installation.
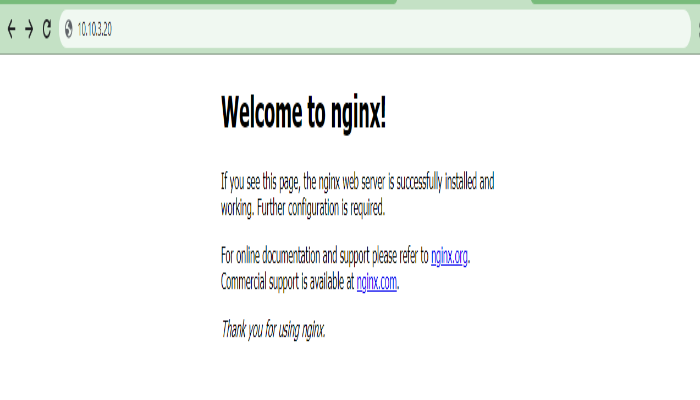
Congratulations!!!!
Managing Nginx.
Below is a summary of commands that may be useful when managing Nginx services.
#Start Nginx
$ sudo systemctl start nginx

#Enable Nginx
$ sudo systemctl enable nginx

# Check status
$ sudo systemctl status nginx

# Stop Nginx
$ sudo systemctl stop nginx
Conclusion.
In this article, we have learned how to install Nginx in Ubuntu 20.04. Please not that this article can as well be used when installing Nginx in Ubuntu 18.04 and Debian 1o as well. I believe that you are in good position to install and manage Nginx services on ubuntu.

One thought on “How to Install Nginx in Ubuntu 20.04”